
A7 开发环境搭建
Development Platform:STM32MP157A-DK1 (官方 demo 板)
本文目录(17 节)
Development Platform:STM32MP157A-DK1 (官方 demo 板)
Host PC:Ubuntu22.04
参考
https://wiki.stmicroelectronics.cn/stm32mpu/wiki/Category:Coprocessor_management_Linux
1. 环境准备
1.1 交叉编译工具
https://github.com/EchoHeim/STM32MP157/tree/openSTlinux5.4/tools/arm-linux-gcc-10.3
添加到环境变量
export PATH=$PATH:/home/$USER/STM32MP157/tools/arm-linux-gcc-10.3/bin1.2 安装依赖软件
sudo apt install device-tree-compiler
sudo apt install libncurses5-dev bison flex
sudo apt install lzop libssl-dev u-boot-tools
1.3 切换gcc版本
Ubuntu22.04的gcc版本是一样1.2,需要安装gcc-9版本,不然编译的时候回报错
/usr/bin/ld: scripts/dtc/dtc-parser.tab.o:(.bss+0x10): multiple definition of `yylloc'; scripts/dtc/dtc-lexer.lex.o:(.bss+0x0): first defined here
collect2: error: ld returned 1 exit status
make-4.1[3]: *** [scripts/dtc/dtc] Error 1
scripts/Makefile.host:99: recipe for target 'scripts/dtc/dtc' failed
scripts/Makefile.build:544: recipe for target 'scripts/dtc' failed
make-4.1[2]: *** [scripts/dtc] Error 2- 安装gcc-9
sudo apt install gcc-9 g++-9- 切换gcc版本
sudo update-alternatives --install /usr/bin/gcc gcc /usr/bin/gcc-9 100
sudo update-alternatives --install /usr/bin/g++ g++ /usr/bin/g++-9 100
1.4 获取SDK源码
Source Code:OpenStLinux 官方源码 我的开源代码
官方源码可参考ST官网下的步骤进行开发,以下只记录我自己在开源代码上的开发
2. TF-A 编译
为了保证安全 ARM 推出了 Arm Trusted Firmware 的可信固件,简称 TF-A; 它是一个开源的软件,最早是用在 Armv8-A,ST 也在 MP1里面使用到了 TF-A,它的作用就是隔离硬件,为硬件提供一个安全环境并且提供安全服务。
2.1 安装 stm32wrapper4dbg 工具
我们在编译 TF-A 或者 Uboot 的时候需要用到 stm32wrapper4dbg 这个工具,否则编译会报错。 ST 提供了这个工具的源码,我们需要在 Ubuntu 下编译并安装这个源码,源码下载地址
下载后编译,生成可执行文件,放入/usr/bin目录下
sudo cp stm32wrapper4dbg /usr/binstm32wrapper4dbg -s 命令
有如下输出则表示安装成功
$ stm32wrapper4dbg -v
stm32wrapper4dbg: invalid option -- 'v'
Usage: stm32wrapper4dbg -s srcfile -d destfile [-b] [-f]
       stm32wrapper4dbg -V
  Add a debug wrapper to a stm32 image.
  If "-b" is not specified, the wrapper would be placed
  after the last byte of the image.

Options:
  -s srcfile   input image in stm32 file format
  -d destfile  output image in stm32 file format
  -b           place the wrapper before the image
  -f           force re-adding the wrapper
  -V           display tool version and quit
2.2 编译 TF-A 源码
安装依赖包
sudo apt-get install device-tree-compiler
在 Makefile.sdk文件中可指定交叉编译工具
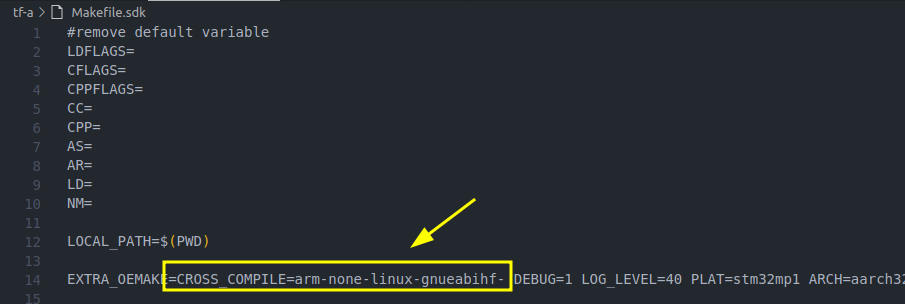
然后就可以进行编译
cd tf-a-stm32mp-2.2.r1/         # 进入 F-A 的源码目录
make -f ../Makefile.sdk all     # 编译 TF-A ‘-f’的意思是重新指定 Makefile,在这里就是指 Makefile.sdk
编译成功后如下图
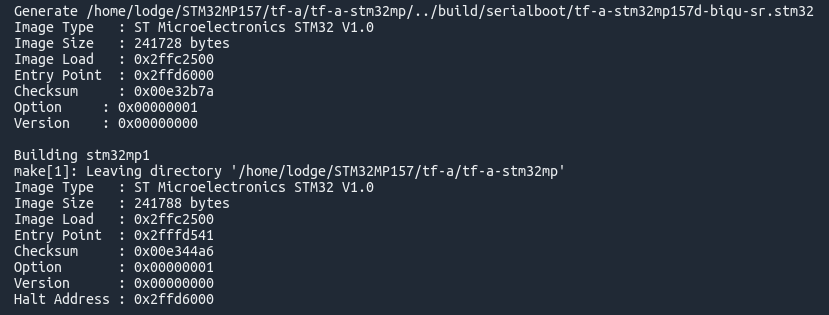
生成文件在 build 目录
3. u-boot 编译
make distclean
make ARCH=arm CROSS_COMPILE=arm-none-linux-gnueabihf- stm32mp157d_biqu_defconfig
make V=1 ARCH=arm CROSS_COMPILE=arm-none-linux-gnueabihf- DEVICE_TREE=stm32mp157d-biqu all
上面命令每次编译的时候都要指定 ARCH、CROSS_COMPILE 和 DEVICE_TREE,这三个含义如下:
- ARCH:指定所使用的平台架构,这里肯定是 arm。
- CROSS_COMPILE:所使用的交叉编译器前缀,本教程使用的是交叉编译器前缀为 arm-none-linux-gnueabihf-
- DEVICE_TREE:设备树文件,uboot 也支持设备树,所以在编译的时候需要指定设备树文件,不同的硬件其设备树文件肯定不同
同样,也可以在makefile里面设置ARCH和CROSS_COMPILE
编译成功后如下

会在u-boot目录下生成 u-boot.bin 和 u-boot.stm32 这两个文件。
u-boot.bin 是 uboot 的二进制可执行文件; u-boot.stm32 是在 u-boot.bin 前面添加了256 个字节头部信息;
STM32MP1 内部 ROM 代码和 TF-A 在运行 uboot 的时候要求前面添加头部信息。
4. kernel 编译
make distclean
make ARCH=arm CROSS_COMPILE=arm-none-linux-gnueabihf- stm32mp157d_biqu_defconfig
make ARCH=arm CROSS_COMPILE=arm-none-linux-gnueabihf- menuconfig
make ARCH=arm CROSS_COMPILE=arm-none-linux-gnueabihf- uImage dtbs LOADADDR=0XC2000040 -j16
同样,也可以在makefile里面设置ARCH和CROSS_COMPILE
编译成功后如下
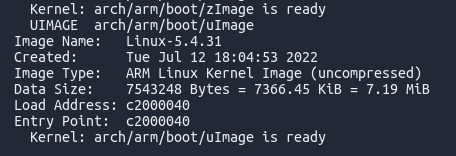
编译完成以后就会在 arch/arm/boot 这个目录下生成一个叫做 uImage 的文件,uImage 就是要用的 Linux 镜像文件,另外也会在 arch/arm/boot/dts 下生成 .dtb 设备树文件。
1. 安装 SDK
1.1 下载
en.SDK-x86_64-stm32mp1-openstlinux-5.10-dunfell-mp1-21-03-31.tar.xz
1.2 安装
# 解压缩
tar xvf en.SDK-x86_64-stm32mp1-openstlinux-5.10-dunfell-mp1-21-03-31.tar.xz

# 赋予权限
cd stm32mp1-openstlinux-5.10-dunfell-mp1-21-03-31/sdk/
chmod +x st-image-weston-openstlinux-weston-stm32mp1-x86_64-toolchain-3.1-openstlinux-5.10-dunfell-mp1-21-03-31.sh

# 运行安装  -d 表示安装路径 (可更改)
./stm32mp1-openstlinux-5.10-dunfell-mp1-21-03-31/sdk/st-image-weston-openstlinux-weston-stm32mp1-x86_64-toolchain-3.1-openstlinux-5.10-dunfell-mp1-21-03-31.sh -d <working directory absolute path>/Developer-Package/SDK
1.3 安装成功
ST OpenSTLinux - Weston - (A Yocto Project Based Distro) SDK installer version 3.1-openstlinux-5.10-dunfell-mp1-21-03-31
===========================================================================================
You are about to install the SDK to "<working directory absolute path>/Developer-Package/SDK". Proceed [Y/n]?
Extracting SDK................................................................................................................................................................................................................done
Setting it up...done
SDK has been successfully set up and is ready to be used.
Each time you wish to use the SDK in a new shell session, you need to source the environment setup script e.g.
 $> . <working directory absolute path>/Developer-Package/SDK/environment-setup-cortexa7t2hf-neon-vfpv4-ostl-linux-gnueabi
1.4 SDK 目录
<SDK installation directory>                                      SDK for OpenSTLinux distribution: details in Standard SDK directory structure article
├── environment-setup-cortexa7t2hf-neon-vfpv4-ostl-linux-gnueabi  Environment setup script for Developer Package
├── site-config-cortexa7t2hf-neon-vfpv4-ostl-linux-gnueabi
├── sysroots
│   ├── cortexa7t2hf-neon-vfpv4-ostl-linux-gnueabi                Target sysroot (libraries, headers, and symbols)
│   │   └── [...]
│   └── x86_64-ostl_sdk-linux                                     Native sysroot (libraries, headers, and symbols)
│       └── [...]
└── version-cortexa7t2hf-neon-vfpv4-ostl-linux-gnueabi
2. 启动 SDK
2.1 配置环境脚本
每次编译前都需要运行一次
source <SDK installation directory>/environment-setup-cortexa7t2hf-neon-vfpv4-ostl-linux-gnueabi2.2 检查环境配置
# 编译架构
PC $> echo $ARCH
arm

# 交叉编译工具 (可在配置环境脚本中更改)
PC $> echo $CROSS_COMPILE
arm-ostl-linux-gnueabi-

# 编译器版本
PC $> $CC --version 或者 arm-ostl-linux-gnueabi-gcc -v
arm-ostl-linux-gnueabi-gcc (GCC) <GCC version>
[...]

# SDK 版本
PC $> echo $OECORE_SDK_VERSION
<expected SDK version>
3. 安装内核
- 前提:确保 SDK 已经安装完成。
3.1 下载
en.SOURCES-kernel-stm32mp1-openstlinux-5.10-dunfell-mp1-21-03-31.tar.xz
3.2 进入 SDK 目录
cd <working directory path>/Developer-Package3.3 安装
tar xvf en.SOURCES-kernel-stm32mp1-openstlinux-5.10-dunfell-mp1-21-03-31.tar.xz     # 解压缩

cd stm32mp1-openstlinux-5.10-dunfell-mp1-21-03-31/sources/arm-ostl-linux-gnueabi/linux-stm32mp-5.10.10-r0
tar xvf linux-5.10.10.tar.xz
3.4 内核目录
linux-stm32mp-5.10.10-r0	Linux kernel installation directory
├── [*].patch			ST patches to apply during the Linux kernel preparation (see next chapter)
├── fragment-[*].config		ST configuration fragments to apply during the Linux kernel configuration (see next chapter)
├── linux-5.10.10		Linux kernel source code directory
├── linux-5.10.10.tar.xz	Tarball file of the Linux kernel source code
├── README.HOW_TO.txt		Helper file for Linux kernel management: reference for Linux kernel build
└── series			List of all ST patches to apply
3.5 编译内核
# 安装依赖包
sudo apt-get install libncurses5-dev libncursesw5-dev libyaml-dev
sudo apt-get install u-boot-tools
sudo apt-get install libyaml-dev

# 运行配置环境脚本 (仅当前终端有效)
source <path to SDK>/environment-setup-cortexa7t2hf-neon-vfpv4-ostl-linux-gnueabi

# 检查编译器
set | grep CROSS
CROSS_COMPILE=arm-ostl-linux-gnueabi-

# 打包补丁
cd linux-5.10.10
for p in `ls -1 ../*.patch`; do patch -p1 < $p; done

# 在源码外部新建一个文件夹,用于存放编译文件
mkdir -p ../build

# 内核配置
make ARCH=arm O="$PWD/../build" multi_v7_defconfig fragment*.config

# 如果有配置片段,也一个一个加载进去
scripts/kconfig/merge_config.sh -m -r -O $PWD/../build $PWD/../build/.config ../fragment-01-xxx.config
scripts/kconfig/merge_config.sh -m -r -O $PWD/../build $PWD/../build/.config ../fragment-02-xxx.config
...

yes '' | make ARCH=arm oldconfig O="$PWD/../build"


# 编译
make ARCH=arm uImage vmlinux dtbs LOADADDR=0xC2000040 O="$PWD/../build"

make ARCH=arm modules O="$PWD/../build"

make ARCH=arm INSTALL_MOD_PATH="$PWD/../build/install_artifact" modules_install O="$PWD/../build"

mkdir -p $PWD/../build/install_artifact/boot/

cp $PWD/../build/arch/arm/boot/uImage $PWD/../build/install_artifact/boot/

cp $PWD/../build/arch/arm/boot/dts/st*.dtb $PWD/../build/install_artifact/boot/

 或者
make ARCH=arm uImage vmlinux dtbs LOADADDR=0xC2000040

make ARCH=arm modules

make ARCH=arm INSTALL_MOD_PATH="$PWD/../build/install_artifact" modules_install

mkdir -p $PWD/../build/install_artifact/boot/

cp $PWD/../build/arch/arm/boot/uImage $PWD/../build/install_artifact/boot/

cp $PWD/../build/arch/arm/boot/dts/st*.dtb $PWD/../build/install_artifact/boot/

# 编译后文件存放在
 $PWD/install_artifact/boot/uImage
 $PWD/install_artifact/boot/<stm32-boards>.dtb
四、安装 U-boot
1、下载
en.SOURCES-u-boot-stm32mp1-openstlinux-5.10-dunfell-mp1-21-03-31.tar.xz
2、
本文可自由转载与修改,但需保留作者署名与出处链接,不得用于商业用途,且衍生作品需以相同方式共享。 转载请注明:MacLodge's Blog · A7 开发环境搭建